If you're considering moving to Office 365, you've probably been looking into the options for Directory Synchronisation. If your AD is anything like ours, you'll have a number of accounts for services, ex-staff, contractors, etc. that you don't really want synchronised up to Office 365.
By default there's no control over the filtering of accounts within the Directory Sync Configuration tool, and the content on setting this up has been "coming soon" for over 6 months, which is a shame, however, when you run the Office 365 Deployment Readiness Tool you'll see the following line in the reports:
Filters were applied to obtain the above object counts for an Office 365 deployment.
So clearly these filters are configured somewhere - but where?
Hunting around on the web, I've found a very useful post for the initial setup scenario from credera: Filtering Users in the Office 365 Directory Synchronization Tool where they talk about using the UI based on Forefront Identity Manager (FIM 2010) - and suggest you run this before DirSync runs. I failed to realise the implication of one aspect of this: Even if you clear the "Synchroize directories now" so DirSync doesn't force the update, you've started the service and the 3 hour timer - so don't start this just before you go home for the weekend, otherwise you'll end up with all your accounts online like I did.
So how do you implement filtering after you've done initial import? Well, it's not too painful once you've looked around at the systems.
Start by firing up the Synchronization Service Manager through using the miisclient.exe executable found deep in the Sync Service's UIShell folder, and switch to the "Management Agents" pane. Click on the "SourceAD" Management Agent line, and select Properties.

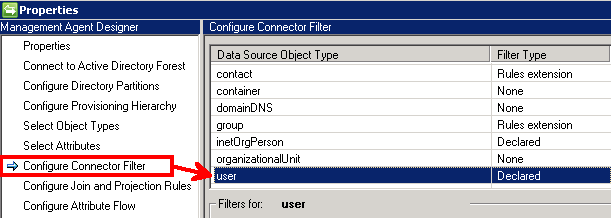
Then select the "Configure Connector Filter" (apparently you can also do things with the Directory Partitions - your milage may vary), select "user", and create a "New..." rule:
As I'm only interested in importing users from our "Staff" organizational unit, and groups from our "Company_UserGroups" OU, I set up one filter with the following rules:
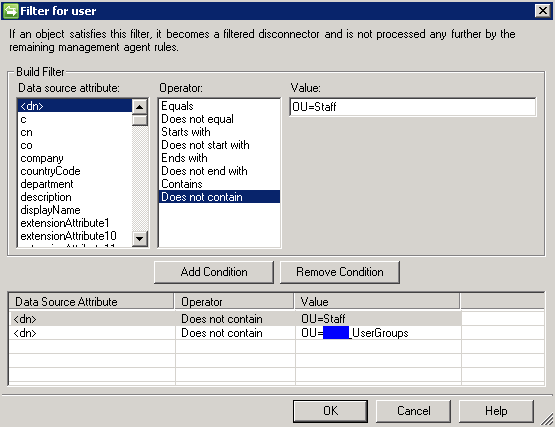
"<dn>" "Does not contain" "OU=Staff"

"<dn>" "Does not contain" "OU=Company_UserGroups"
Ok out of the dialogs and return to the "Operations" page. You now need to perform a Full synchronisation to remove the filtered out users:
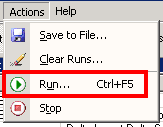
From the Actions menu, select "Run..."
Ensure that "SourceAD" Management Agent is selected in the top dropdown, then select "Full Import Full Sync" from the list of Run profiles, and press "OK".
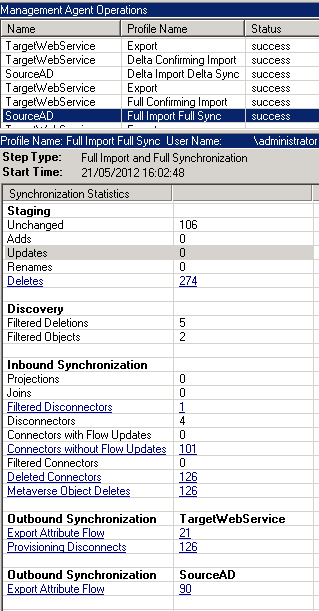
Once that operation shows has a status of "success", select "Run..." again, and this time switch to the "TargetWebService" management agent, and choose the "Full Confirming Import" run profile, and press "OK".

Once that operation also shows a status of "success", you'll want to run the "Export" profile for the "TargetWebService" management agent.
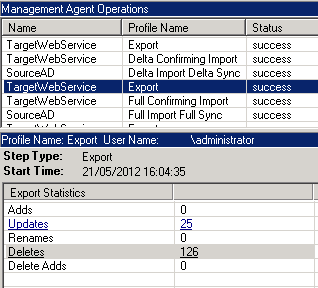
As you can see, after each run you should see confirmation of deleted accounts in the reports.
To confirm that they've really gone away, you can then fire up forced run of the standard sync using the powershell command Start-OnlineCoexistenceSync if you run the DirSyncConfigShell powershell script from the root of the DirSync install folder, or by re-running the Directory Sync Configuration Tool.
Just deleting the users from Office 365 using the Remove-MsolUser command obviously didn't work as they were just recreated again with the next diffential sync.
I also found that the event log will contain warnings that your configuration has changed and you need to perform a full sync for the changes to take effect:
The management agent "SourceAD" completed run profile "Delta Import Delta Sync" with a delta import or delta synchronization step type. The rules configuration has changed since the last full synchronization.
User Action
To ensure the updated rules are applied to all objects, a run with step type of full synchronization should be completed.
Filed under: Office365, PowerShell, Tools
There are a few blog posts out there already about setting up the SharePoint Information Worker Demo machines in a "dual boot from VHD" mode, but I found that I needed to pull a number of them together to get it all up and running to my satisfaction.
Firstly, download the latest 2010 IW Demo VM from Microsoft (at the time of writing, this was 2010-10, released 26 March 2012).
For basic SharePoint demos, you can get away with just Server A, which gives you everything except Exchange (Server B) and Lync (Server C).
This walkthrough assumes you don't have access to Hyper-V - which will have implications later on unfortunately.
Ensure you've also got yourself:
-
Optional: VirtualBox - a great little app for creating and running Virtual Machines - we're going to use this to get the basic configuration up and running before we set up the boot-to-VHD.
-
Drivers - You'll want to ensure that you have suitable drivers for a few bits of hardware - especially Graphics Cards and Wireless adaptors if you're running this on a laptop.
Configure your Virtual Machine
If you want to save yourself a little bit of pain later on, once you've downloaded and unpacked the Virtual Machine, fire up VirtualBox and create a new Windows 2008 Server. When prompted to for the hard disk, attach the one you've just unpacked.
Before firing up the VM, you need to change the hard disk from SATA to IDE otherwise you'll be bluescreening during boot:
-
Select the VM, and click on the Settings button.
-
Switch to the Storage page, and remove the VHD from under the SATA controller - make sure you KEEP the actual files when prompted.
-
Then, add a new Hard Disk under the IDE Controller (the stacked disk icon), and point it at the VHD.
You're now good to go. Fire up the VM, and log in, (using the admin password "pass@word1" - remember that it's currently using the US keyboard layout, so the @ symbol is on the 2 (or quote mark).
Let the warm-up scripts run, but don't try and view SharePoint yet, we haven't configured the networking correctly, but you should be able to open the Central Admin site to confirm things are correct.
You can either configure standalone networking now, or move on to the Dual Boot options.
Setup Networking
Open up the device manager, select the root computer node (demo2010a), and then from the Actions menu select "Add Legacy Device".
In the wizard, you want to add a "Network adapter", then select "Microsoft" from the list of manfacturers, and "Microsoft Loopback Adapter" from the list of network adapters.
Then open up the Network and Sharing Center, and go through to Configure Network Connections. Find the new adaptor (it'll have a description of "Microsoft Loopback Adapter"), right click on it, and select "Properties". Then select the "Internet Protocol Version 4 (TCP/IPv4)" item, and press the Properties button.
Set up the connection as follows:
-
Use the following IP address:
-
IP address: 192.168.150.1
-
Subnet Mask: 255.255.255.0
-
Default Gateway: Leave Blank.
-
Use the following DNS server addresses:
-
Preferred DNS sever: 192.168.150.1
And click OK. You'll then get a warning that the IP address you've entered is already assigned to another adapter (Microsoft Virtual Machine Bus Network Adaptor) which is no longer present in the computer. Select "Yes" you do want to remove the static IP configuration for the absent adapter.
You should now be able to view the empty Intranet Team site site on http://intranet/ (the default homepage of Intranet.contoso.com may not work at this point, however everything else should now be inplace, including the profiles, and search - try searching for "Tad" or "Erika".
Dual Boot
Next it's time to set up our Dual Boot setup - I've been happily following Scott Hanselman's advice on this for some time, and you should too: Less Virtual More Machine - The magic of Boot to VHD.
If you've left the VHD in the default unpacked location, there's a space in the folder path - when using bcdedit you need to ensure that the path is quoted, for example:
bcdedit /set {guid} device vhd="[C:]\VHDs\2010-10a\Virtual Hard Disks\2010-10a.vhd"
Note also that these VHDs are expandable to 125GB, and when you boot to VHD they need to be able to fully expand, even if they're not using it all - so make sure you've cleared off the .rar files, etc before continuing.
Enabling the Wireless Network
Once you're up and running, if you're on a Laptop, you'll probably want to enable the Wireless Networking Service:
The key thing to do here is to install the Feature from the Server Management view, called "Wireless LAN Service" - once that's configured, you can install your WiFi card drivers and connect to a wireless network (assuming you've configured some AV software, etc.).
Fixing the Locale
If you're like me and not based in the US, you may find typing things like the @ symbol tediously complex, in which case you will probably want to change the system locale from English (United States) to something more in line with your keyboard layout.
This is fairly easily accomplished through the "Region and Language" control panel, but don't forget to switch to the Administrative tab and copy the keyboard settings over to the "Welcome screen and new user accounts" - you'll need to restart for these changes to take effect.
Once you've done this however, you will probably notice that nickname and phonetic searching no longer work, so take a look at my short summary of helpful links for enabling SharePoint People Search.
Limitations
The core limitation that I've found with doing it this way is that the content packs aren't installed by default, and unless the VM is attached to a HyperV system you can't install them using the downloadable content packs as these work by attaching a (very) virtual DVD to the VM - and it won't work with Virtual Box or dual booted systems.
I've currently managed to get around this by ripping the content database out of an old instance of the VM (hunt around for 2010-07a) which had the content pre-configured, however I'm still missing some of the walkthrough content - most notably the KPI and Business Connectivity configuration.
Filed under: SharePoint


