Setting up Umbraco Azure AD Authentication
Posted 21 June 2019, 08:48 | by Ben Duguid | Perma-link
l recently had a requirement to add Azure Active Directory authentication to a client's Umbraco Back Office, with the added request of managing the CMS group membership via Azure AD as well.
To do this, we're going to use an Azure AD Application Registration, with some custom roles - by using roles we remove the need to share more information about the User and their memberships with our application, and we make the application more portable - we can deploy the application manifest into any directory and the same role names are returned to the calling web site, rather than a unique group ID, and because they are textual names we can also easily wire up our Umbraco group aliases to the role names, without working with unwieldy GUIDs (Umbraco also requires that a group alias doesn't start with a number).
When following through Shazwazza's post Configuring Azure Active Directory login with Umbraco, I ran into a couple of problems with the basic set-up mainly that the Token ID wasn't included in the responses, and then that the users email address wasn't populating in the generated claim correctly.
Start by installing the UmbracoCms.IdentityExtensions.AzureActiveDirectorypackage into a suitable project in your solution. This will add some dependencies and a few sample classes in either an app_start or the app_code folder depending on your project type, however these consist of two classes with OWIN startup attributes and a couple of helper methods so you could move them if needed. These classes are very well documented, so it should be fairly easy to see what's happening in there - we'll come back to them in a short while.
Then jump over to Azure, where you'll need permissions to create Applications and Enterprise Applications at least.
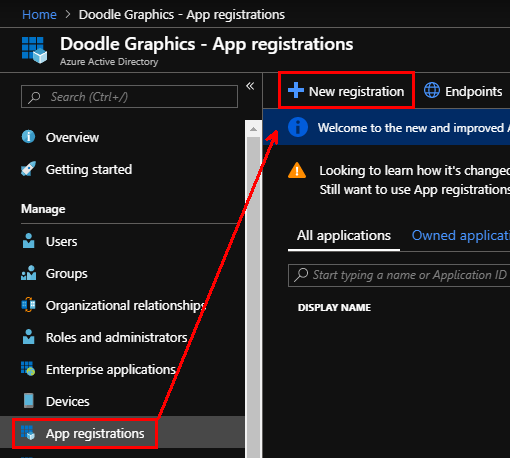
Open the Azure Active Directory blade for the subscription you are connecting to, and select "App Registrations" and then "New registration":
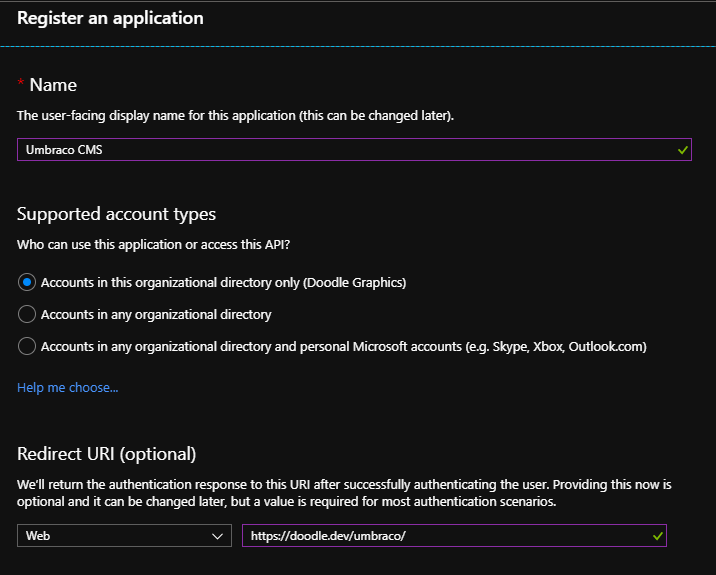
As we're granting users access to the back office we'll stick with the default of "Accounts in this organisational directory only", and as the name of the application will be shown to users if they have to grant access to their data make it meaningful (you can change it later). Finally add your first "Redirect URI" (if you have more environments that you want to control with a single application we can add these later) - this should be the full path to your Umbraco instance, including the trailing slash:
Note: This area has been improved recently so these screenshots may be slightly out of date
Press "Register" and your application will be created.
Switch to the "Authentication" pane for your new App - you need to enable "ID tokens" in the Advanced Settings - "Implicit grant" section. If you have more than one environment you're protecting with same users, you can also add the additional Redirect URIs here.

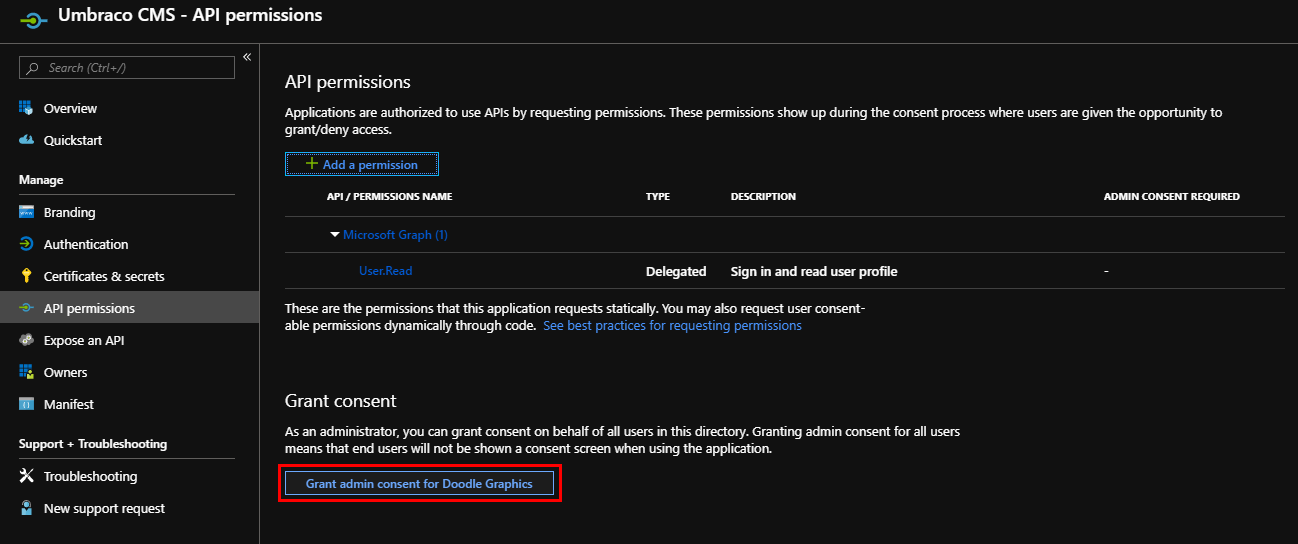
Next, under "API permissions", you ideally want to "Grant admin consent for [Your Directory]" for the User.Read permission that is added by default to the App:
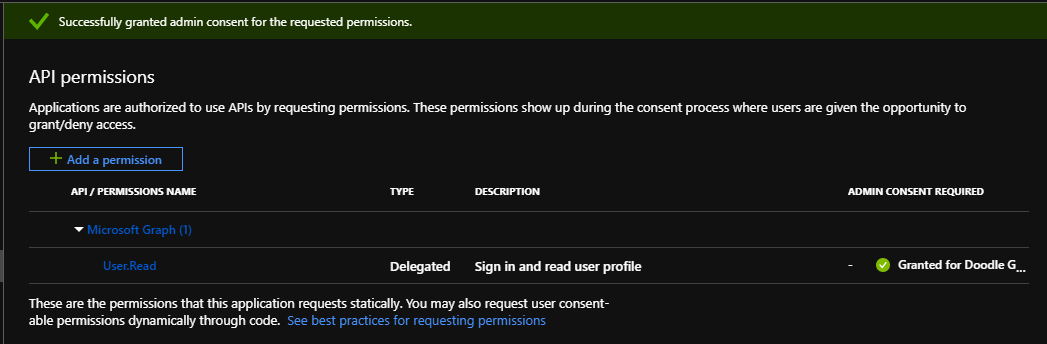
Which should result in the consent being given for all users:
Next you need to set up the Roles that your application is going to grant to users - these are what we're going to map to Umbraco's back office groups. If you don't want to use the new preview UI to create these, you can edit the manifest directly. Open the Manifest pane and find the "appRoles" array:
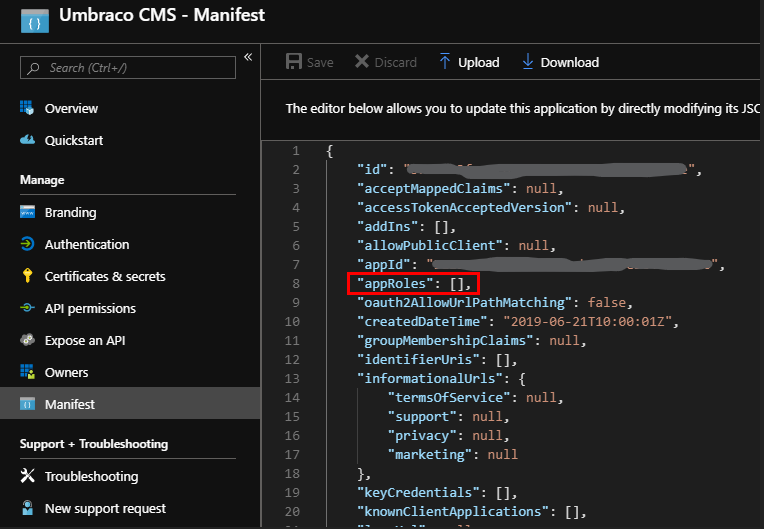
Put your cursor between the braces, and then add at least the following three roles - you'll need to generate a unique GUID for each role, and enter it as 00000000-0000-0000-0000-000000000000 (i.e. hyphens but no curly braces):
{
    "allowedMemberTypes": [
        "User"
    ],
    "description": "Members of the Umbraco Administrators group.",
    "displayName": "Umbraco Admin",
    "id": "[UniqueGUID]",
    "isEnabled": true,
    "lang": null,
    "origin": "Application",
    "value": "admin"
},
{
    "allowedMemberTypes": [
        "User"
    ],
    "description": "Members of the Umbraco Editors group.",
    "displayName": "Umbraco Editor",
    "id": "[UniquieGuid]",
    "isEnabled": true,
    "lang": null,
    "origin": "Application",
    "value": "editor"
},
{
    "allowedMemberTypes": [
        "User"
    ],
    "description": "Members of the Umbraco Writers group.",
    "displayName": "Umbraco Writer",
    "id": "[UniqueGuid]",
    "isEnabled": true,
    "lang": null,
    "origin": "Application",
    "value": "writer"
}
Note that the display name can contain spaces and the value parameter will be used to map to the Group Alias in Umbraco.
From the Overview blade of your application, make a note of the Application (client) ID and Directory (tenant) ID, as you'll need them later. You can also update the Branding for your application that may appear on your users Applications page - the logo also appears in the Application listings in Azure, so can be useful to help you spot it amongst all the others.
Having done all that, you can then configure some users - to do this switch to the "Enterprise Applications" blade in your Azure Active Directory and locate your new Application Registration - depending on your configuration you may have many or very few, and so may have to search for it either by name or the Application (client) ID.
Select your application, and open the "Users and groups" blade and select "Add user". Depending on your Azure Active Directory plan, your experience may be better or worse - on the Free plan you can only assign users to roles, but with any of the paid plans (Basic and above) you can add groups to roles (when selecting users, groups and roles, make sure that you do press the "Select" button at the bottom of the blade each time!):
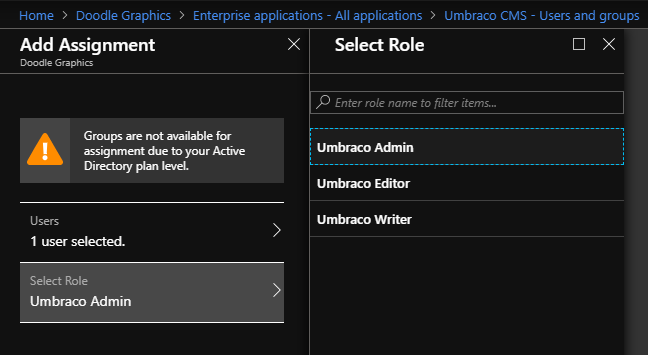
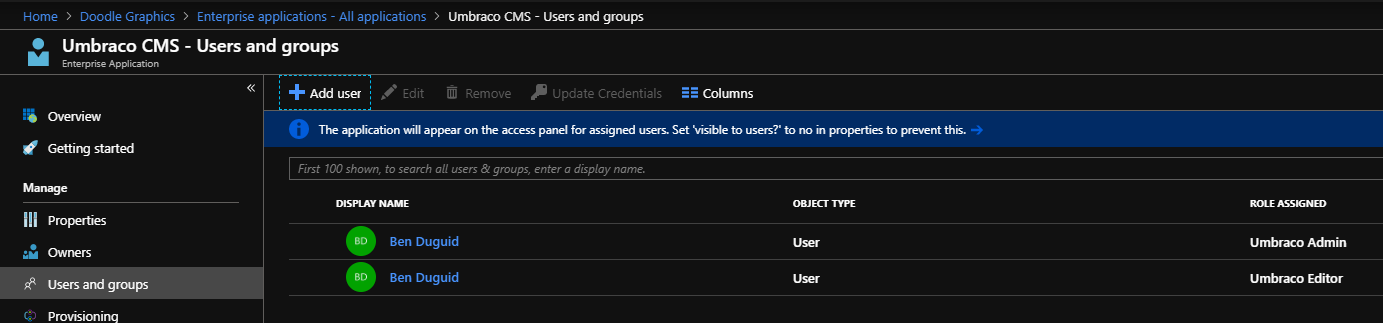
To add a user or group to more than one role, you need to add them multiple times:
Back in your code, first up add the Application (client) Id, Directory (tenant) Id and redirect URI to your appSettings in the web.config - these aren't secrets, so should be safe in source control, but you'll want to ensure that your redirectURI is updated for each environment so that your users are returned to the correct instance.
As I planned on using App_Start\UmbracoStandardOwinStartup.cs as the basis of my application, I updated the owin:appStartup setting to reference UmbracoStandardOwinStartup.
In the UmbracoStandardOwinStartup class, just update the call to ConfigureBackOfficeAzureActiveDirectoryAuth with the values added to the appSettings - note that you can use the Directory (tenant) Id for both the tenant and issuerId properties, which is useful if you're not sure which domain is associated with the directory.
The main changes are then in the UmbracoADAuthExtensions.cs class. This class contains the single extension method ConfigureBackOfficeAzureActiveDirectoryAuth called by the start-up class and this is where I got to work.
To resolve the issue with the user's email address not being found, I wrote a custom handler for the SecurityTokenValidated notification. To wire that up, add the following to the OpenIdConnectAuthenticationOptions constructor call:
Notifications = new OpenIdConnectAuthenticationNotifications
{
 SecurityTokenValidated = async notification => { AzureActiveDirectory.HandleNotification(notification); },
}
This calls the following custom method, which uses the user's full name (rather than just their first name) and then finds either the Email or UPN claims, which should contain the user's email address.
// Need to handle the case when the email address is returned on the UPN claim.
internal static void HandleNotification(SecurityTokenValidatedNotification<OpenIdConnectMessage,
                                                                    OpenIdConnectAuthenticationOptions> notification)
{
   var id = notification.AuthenticationTicket.Identity;

   // we want to keep name (as a whole name) and roles
   var name = id.FindFirst(ClaimTypes.Name);

   var email = id.FindFirst(ClaimTypes.Email) ?? id.FindFirst(ClaimTypes.Upn);

   var roles = id.FindAll(ClaimTypes.Role);

   // create new identity and set name and role claim type
   var nid = new ClaimsIdentity(
       id.AuthenticationType,
       ClaimTypes.Name,
       ClaimTypes.Role);

   nid.AddClaim(name);
   nid.AddClaims(roles);
   nid.AddClaim(id.FindFirst(ClaimTypes.NameIdentifier));
   var emailClaim = new Claim(ClaimTypes.Email, email.Value);
   nid.AddClaim(emailClaim);

   notification.AuthenticationTicket = new AuthenticationTicket(
       nid,
       notification.AuthenticationTicket.Properties);
}
That should get basic authentication up and running, but requires users exist in Umbraco already so we need to enable Auto Linking, and then add and remove groups based on the roles included in the claim from Azure AD.
Back in ConfigureBackOfficeAzureActiveDirectoryAuth, we need to create a new ExternalSignInAutoLinkOptions object and add it to our OpenIdConnectAuthenticationOptions object. Again, this is going to use a couple of custom handlers to configure the values:
// Don't add the user to any groups by default, these should be added by the claims from Azure.
var autoLinkOptions = new ExternalSignInAutoLinkOptions(true, new string[] { }, defaultCulture: "en-GB");

// Handle the Roles from the Azure AD Application
autoLinkOptions.OnAutoLinking = AzureActiveDirectory.OnAutoLinking;

// Check the Roles from the Azure AD Application on subsequent login
autoLinkOptions.OnExternalLogin = AzureActiveDirectory.OnExternalLogin;

adOptions.SetExternalSignInAutoLinkOptions(autoLinkOptions);
The OnAutoLinking method is fairly simple as it just calls out to the OnExternalLogin method:
internal static void OnAutoLinking(BackOfficeIdentityUser user, ExternalLoginInfo info)
{
    // Let login handle sorting out the roles.
    OnExternalLogin(user, info);
}
The OnExternalLogin does all the heavy lifting
public static bool OnExternalLogin(BackOfficeIdentityUser user, ExternalLoginInfo info)
{
    // check user is still in an editing group
    var applicationRoles = info.ExternalIdentity
                               .FindAll(c => c.Type == info.ExternalIdentity.RoleClaimType)
                               .Select(c => c.Value)
                               .ToList();

    if (applicationRoles.Any())
    {
        var groups = user.Groups.ToList();

        var groupsToRemove = groups.Where(g => !applicationRoles.Contains(g.Alias))
                                   .ToArray();
        var groupsToAdd = applicationRoles.Where(r => !groups.Any(g => g.Alias.Equals(r)));

        // Remove old groups and reset the group array, then sort out the roles.
        // Has to be done this way to ensure correct change tracking on the underlying user.
        foreach (var group in groupsToRemove)
        {
            groups.Remove(group);
        }

        user.Groups = groups.ToArray();

        foreach (var group in groupsToRemove)
        {
            var userRole = user.Roles.FirstOrDefault(r => r.RoleId.Equals(group.Alias));

            if (userRole != null)
            {
                user.Roles.Remove(userRole);
            }
        }

        foreach (string group in groupsToAdd)
        {
            user.AddRole(group);
        }

        return true;
    }

    return false;
}
And with that in place, you should then be able to log in to your Umbraco instance using the credentials attached to the account linked to the Azure AD (for example a Windows Live, Office 365 or Federated AD account). As you add or remove roles from the user, these are reflected each time they authenticate through the application.
Filed under: ASP.NET MVC, Azure, Umbraco